Introduction to SD Card Modules with Arduino
The SD Card Module is an essential component for adding substantial data storage capabilities to your Arduino projects. This comprehensive guide covers everything from basic connections to advanced data logging techniques, enabling you to store sensor readings, create data loggers, save configuration files, and much more.
Why Use SD Card Modules with Arduino?
While Arduino boards have limited onboard EEPROM storage (typically just a few kilobytes), SD cards offer gigabytes of storage at remarkably low cost. SD card modules act as intermediaries, handling voltage conversion (3.3V for SD cards vs 5V for many Arduinos) and providing the necessary SPI (Serial Peripheral Interface) communication.
Massive Storage
Expand from kilobytes to gigabytes of storage for data-intensive projects like long-term environmental monitoring.
File Management
Create, read, write, and organize files in familiar FAT16/FAT32 file systems compatible with computers.
Data Logging
Perfect for recording sensor data over extended periods without requiring constant computer connection.
Easy Data Transfer
Remove SD card and read data directly on your computer using standard file explorers.
Practical Applications
SD card modules unlock numerous possibilities for Arduino projects:
- Environmental Monitoring: Log temperature, humidity, air quality data over weeks or months
- GPS Data Logging: Store location coordinates for tracking and mapping applications
- Energy Monitoring: Record power consumption patterns for analysis and optimization
- Scientific Experiments: Capture precise sensor data for laboratory research
- Audio Recording: Store audio samples with additional hardware components
- Time-lapse Photography: Save timestamps and control commands for camera systems
SD Card Module Hardware Overview
Pin Configuration
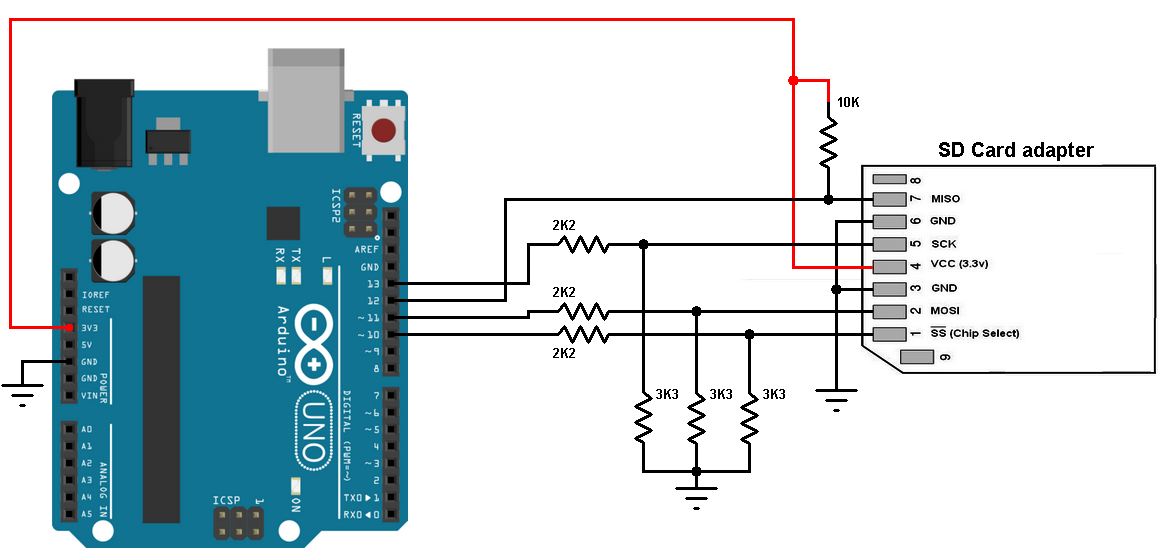
Standard pins: VCC, GND, MISO, MOSI, SCK, CS (Chip Select)
Voltage Regulation
Most modules include 3.3V regulator for safe SD card operation with 5V Arduino
Communication Protocol
Uses SPI (Serial Peripheral Interface) for high-speed data transfer
Level Shifting
Converts 5V Arduino signals to 3.3V safe for SD cards
Required Components
1 Hardware Requirements
To follow this tutorial, you'll need these essential components:
- Arduino Board: Uno, Mega, Nano, or similar with SPI pins
- SD Card Module: Standard SPI-based module with microSD slot
- microSD Card: Formatted as FAT16 or FAT32 (2GB-32GB recommended)
- Jumper Wires: Male-to-female or male-to-male for connections
- Breadboard: Optional but recommended for prototyping
- USB Cable: For Arduino programming and power
2 SD Card Preparation

Before using an SD card with Arduino, proper preparation is essential:
- Backup Data: Formatting erases everything - backup existing files first
- Format as FAT32: Most compatible file system for Arduino SD library
- Windows Formatting: Right-click drive → Format → Choose FAT32 → Quick Format
- Mac Formatting: Use Disk Utility → Erase → MS-DOS (FAT)
- Linux Formatting: Use GParted or
mkfs.fat -F 32 /dev/sdX1 - Test on Computer: Create a test file to verify card works properly
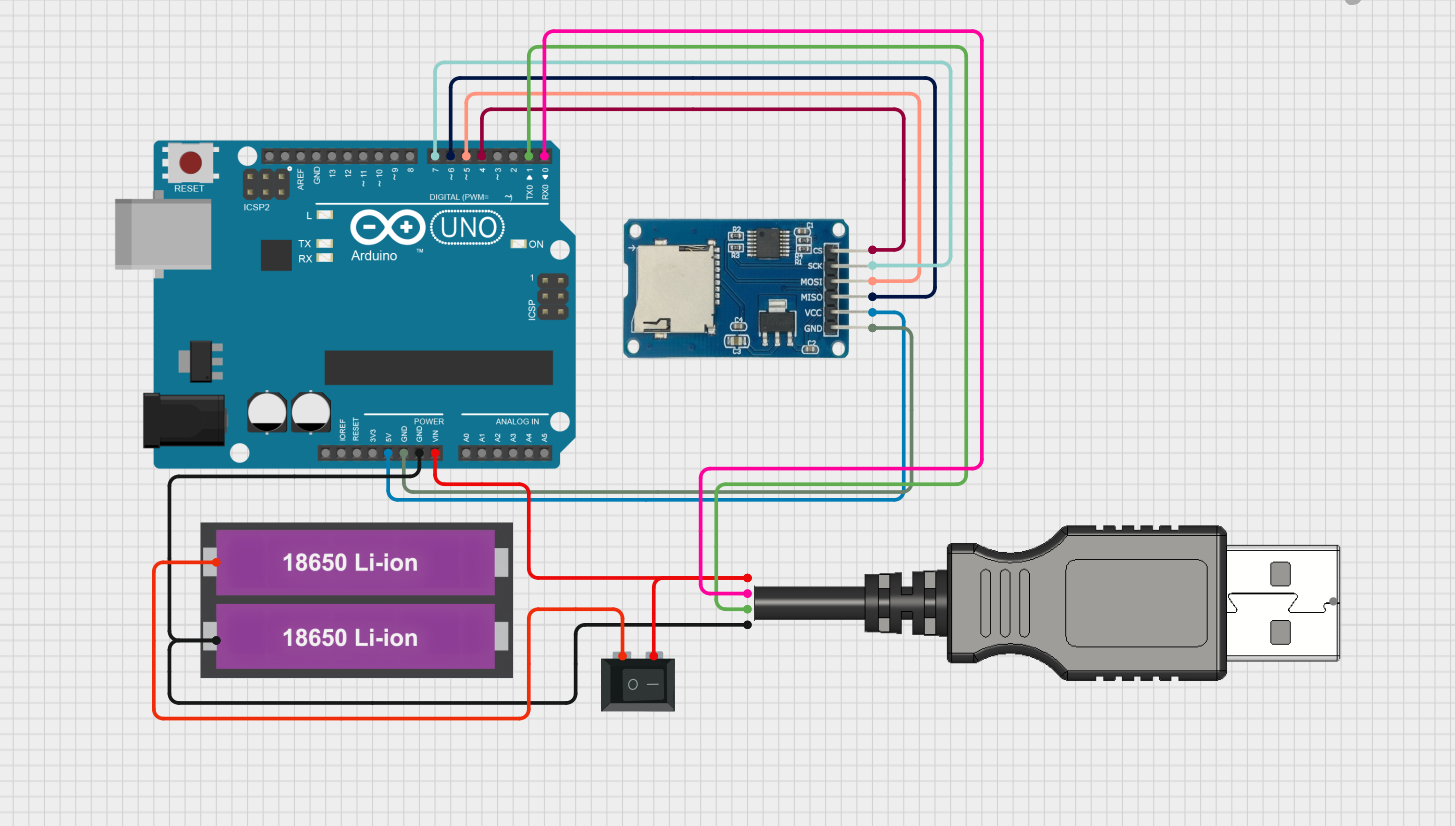
Wiring Instructions
3 Connection Guide
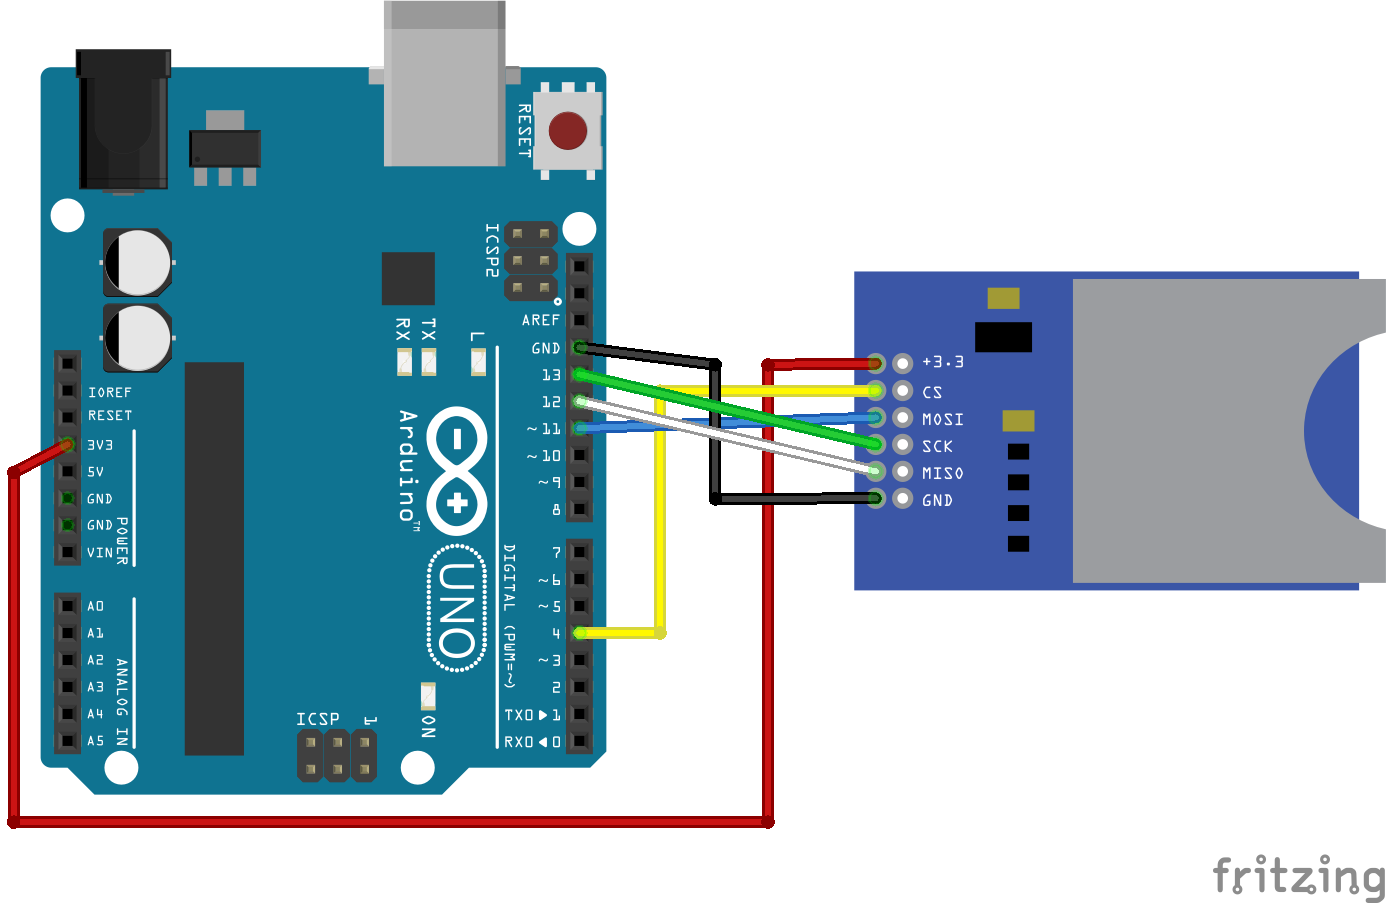
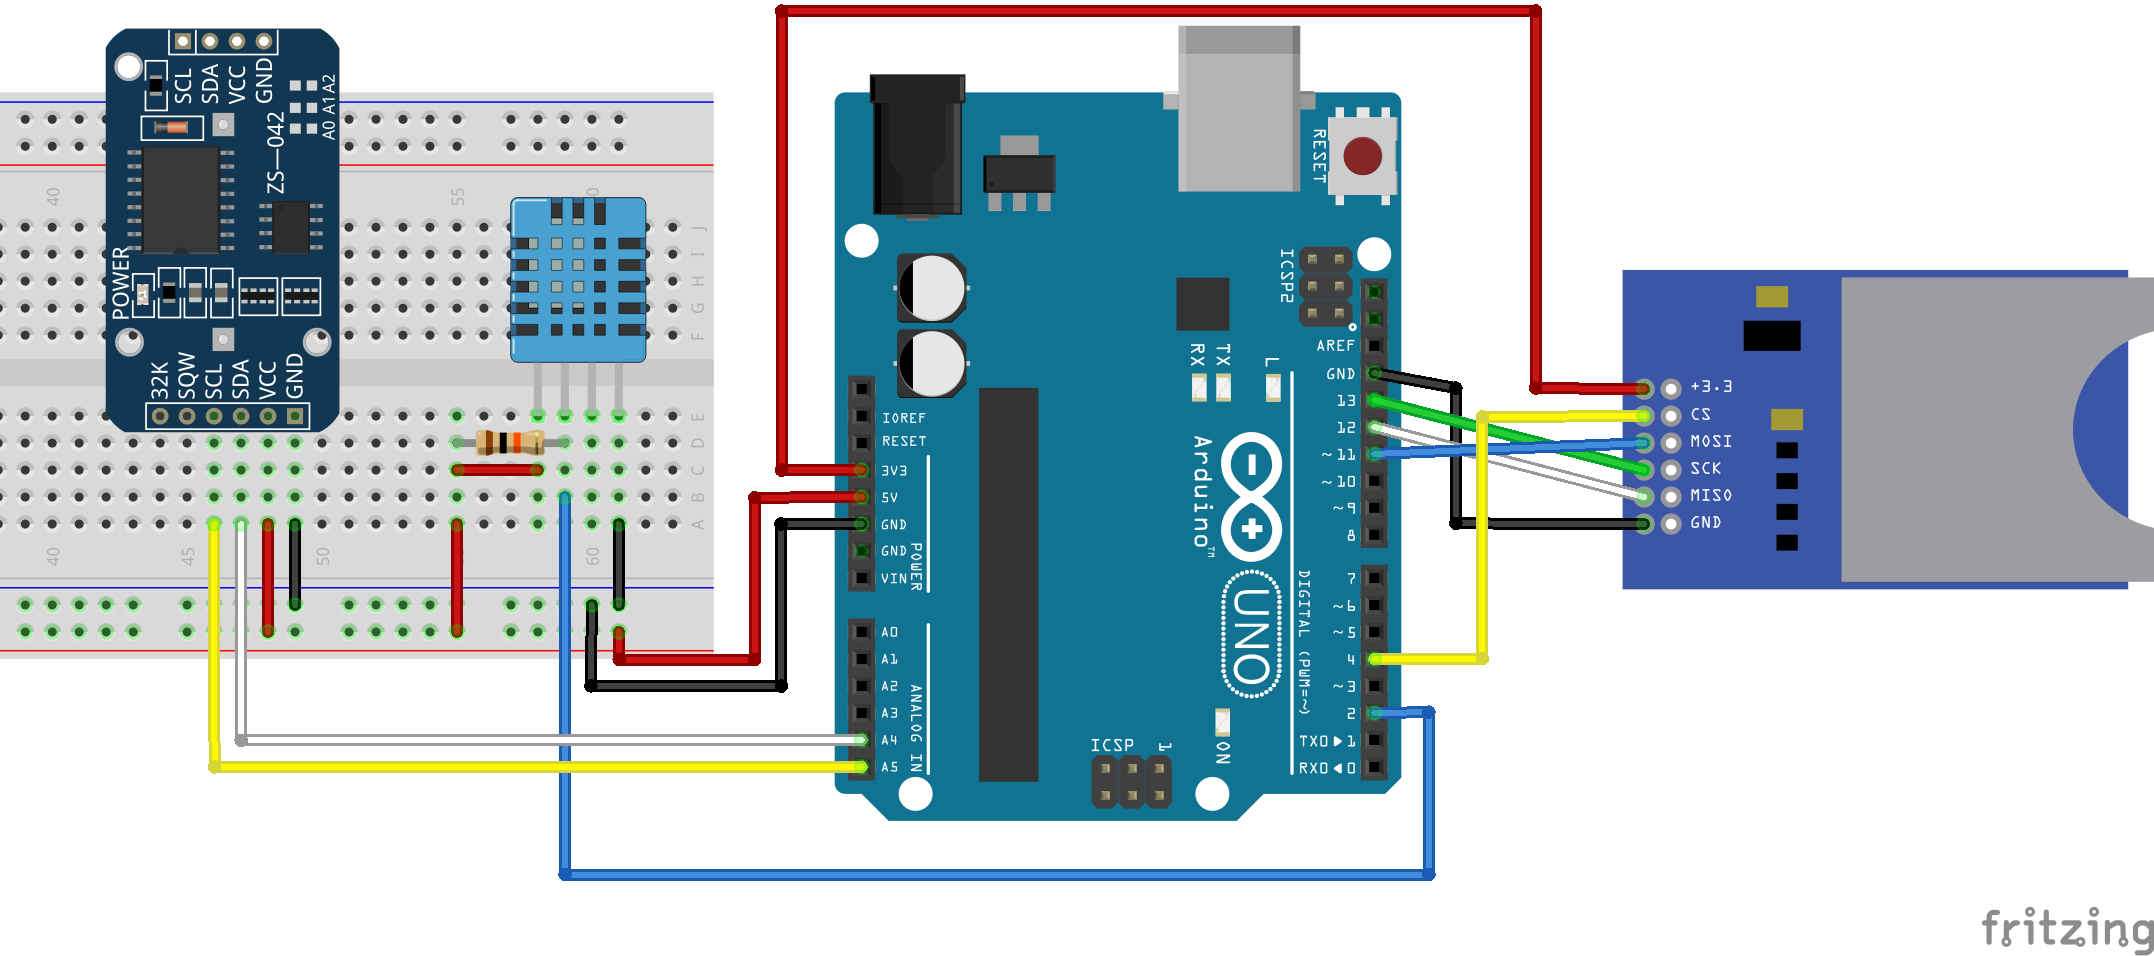
For Arduino Uno, Nano, and similar boards:
- SD Module VCC → Arduino 5V
- SD Module GND → Arduino GND
- SD Module MOSI → Arduino Pin 11
- SD Module MISO → Arduino Pin 12
- SD Module SCK → Arduino Pin 13
- SD Module CS → Arduino Pin 4 (or any digital pin)
For Arduino Mega:
- SD Module VCC → Arduino 5V
- SD Module GND → Arduino GND
- SD Module MOSI → Arduino Pin 51
- SD Module MISO → Arduino Pin 50
- SD Module SCK → Arduino Pin 52
- SD Module CS → Arduino Pin 53 (or any digital pin)
Essential Arduino SD Library
The Arduino SD library comes pre-installed with the Arduino IDE and provides all necessary functions for file operations. Key capabilities include:
| Function | Description | Example |
|---|---|---|
| SD.begin() | Initialize SD card communication | SD.begin(chipSelectPin) |
| SD.open() | Open file for reading or writing | SD.open("data.txt", FILE_WRITE) |
| file.print() | Write data to open file | file.print("Sensor value: ") |
| file.read() | Read data from open file | char data = file.read() |
| SD.exists() | Check if file or directory exists | SD.exists("/data") |
| SD.mkdir() | Create new directory | SD.mkdir("/sensor_data") |
Basic SD Card Test Sketch
4 Initial Testing Code
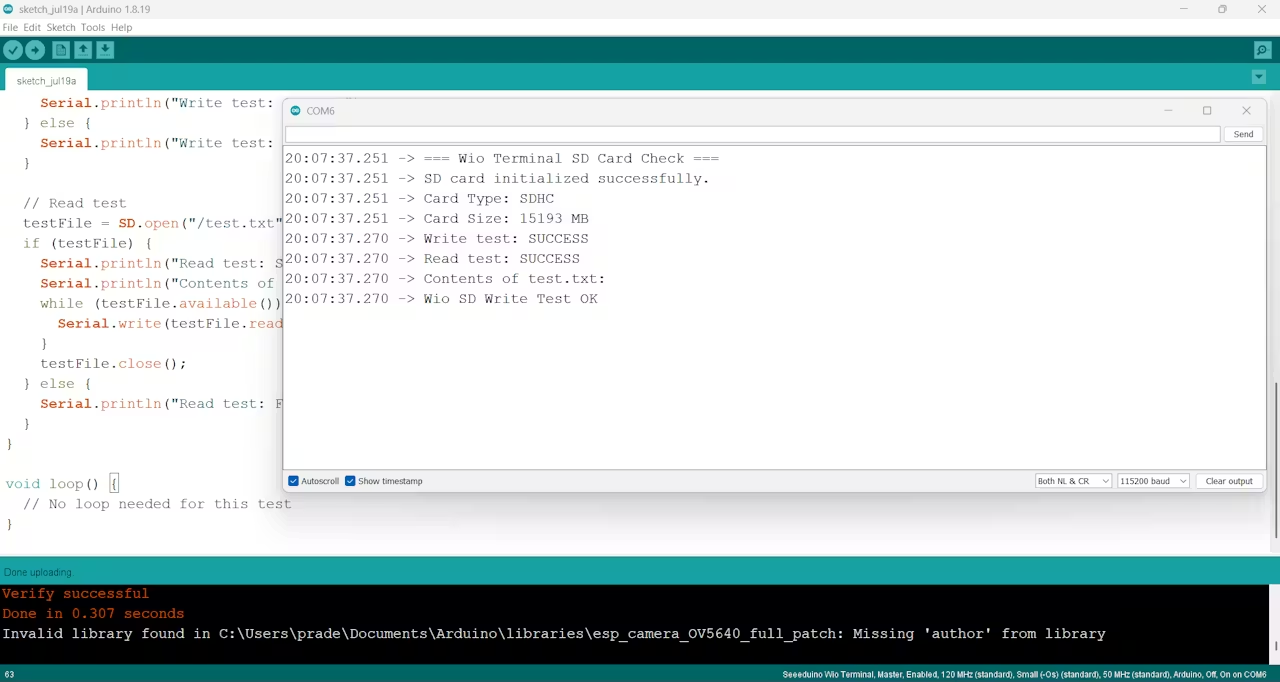
Upload this code to verify your SD card module is working correctly:
#include#include File myFile; const int chipSelect = 4; void setup() { Serial.begin(9600); Serial.print("Initializing SD card..."); if (!SD.begin(chipSelect)) { Serial.println("Initialization failed!"); return; } Serial.println("Initialization done."); // Open file for writing myFile = SD.open("test.txt", FILE_WRITE); if (myFile) { Serial.print("Writing to test.txt..."); myFile.println("SD card test successful!"); myFile.close(); Serial.println("done."); } else { Serial.println("Error opening test.txt"); } // Re-open file for reading myFile = SD.open("test.txt"); if (myFile) { Serial.println("test.txt content:"); while (myFile.available()) { Serial.write(myFile.read()); } myFile.close(); } else { Serial.println("Error opening test.txt for reading"); } } void loop() { // Nothing happens here }
Creating a Data Logger Project
5 Complete Data Logger Code
Here's a complete data logger that records temperature readings with timestamps:
#include#include const int chipSelect = 4; const int temperaturePin = A0; File dataFile; void setup() { Serial.begin(9600); // Initialize SD card if (!SD.begin(chipSelect)) { Serial.println("SD card initialization failed!"); while (1); // Halt if SD card fails } Serial.println("SD card initialized."); // Check if file exists, create header if not if (!SD.exists("datalog.csv")) { dataFile = SD.open("datalog.csv", FILE_WRITE); if (dataFile) { dataFile.println("Timestamp,Temperature (C)"); dataFile.close(); } } } void loop() { // Read temperature (simulated with potentiometer for this example) int sensorValue = analogRead(temperaturePin); float voltage = sensorValue * (5.0 / 1023.0); float temperatureC = voltage * 100; // Simple conversion for demonstration // Open file for appending dataFile = SD.open("datalog.csv", FILE_WRITE); if (dataFile) { // Create timestamp (simplified - consider RTC module for accurate time) unsigned long timestamp = millis(); // Write data to file dataFile.print(timestamp); dataFile.print(","); dataFile.println(temperatureC); dataFile.close(); // Also print to Serial for monitoring Serial.print("Logged: "); Serial.print(timestamp); Serial.print(" ms, "); Serial.print(temperatureC); Serial.println(" C"); } else { Serial.println("Error opening datalog.csv"); } delay(5000); // Log every 5 seconds }
Code Explanation: This creates a CSV file that can be easily opened in spreadsheet software. The code initializes the SD card, creates a header row if the file doesn't exist, then periodically logs timestamped temperature readings.
Advanced File Operations
6 Directory Management
Organize your data with proper directory structure:
// Create a directory
if (SD.mkdir("/sensor_data")) {
  Serial.println("Directory created");
}

// Check if directory exists
if (SD.exists("/sensor_data")) {
  Serial.println("Directory exists");
}

// List files in directory
void listFiles(const char* dirname) {
  Serial.print("Listing files in: ");
  Serial.println(dirname);

  File root = SD.open(dirname);
  if (!root) {
    Serial.println("Failed to open directory");
    return;
  }

  File file = root.openNextFile();
  while (file) {
    if (!file.isDirectory()) {
      Serial.print("  FILE: ");
      Serial.print(file.name());
      Serial.print("  SIZE: ");
      Serial.println(file.size());
    }
    file = root.openNextFile();
  }
}
7 Efficient Data Writing Techniques
For frequent data logging, optimize write operations to extend SD card lifespan:
- Buffer Data: Collect data in memory and write larger chunks less frequently
- Minimize Open/Close: Keep files open during logging sessions instead of opening for each write
- Check File Size: Create new files when current file reaches size limit
- Implement Error Handling: Add recovery mechanisms for write failures
Troubleshooting Common Issues
Initialization Failed
Solution: Check wiring connections, verify SD card format (FAT16/FAT32), try different SD card, check CS pin number.
File Corruption
Solution: Always close files after writing, implement proper error checking, avoid removing SD card while powered.
Power Issues
Solution: Ensure stable power supply, add decoupling capacitors, consider separate power for SD module in high-current projects.
Write Failures
Solution: Check available space, verify file system integrity, reduce write frequency, check for loose connections.
Power Consumption Considerations
8 Battery-Powered Projects
For battery-powered projects, SD card power consumption matters:
- Active Writing: 15-100mA (depending on card class and size)
- Idle Current: 0.1-2mA
- Sleep Mode: 50-200μA
Power-Saving Tips:
- Power the SD module through a digital pin to turn it off when not needed
- Minimize write operations by buffering data
- Use lower-capacity cards (they often consume less power)
- Consider disabling SPI bus when not in use
Comparison with Other Storage Options
| Storage Type | Pros | Cons | Best For |
|---|---|---|---|
| SD Card | High capacity, low cost, removable, standard file system | Higher power, finite write cycles, requires module | Data logging, file storage, large datasets |
| EEPROM | Low power, integrated, non-volatile | Limited capacity (KB), limited write cycles | Configuration storage, small data |
| Flash Memory | Medium capacity, direct interface | More expensive per MB, specialized interface | Medium storage needs |
| External HDD | Massive capacity | High power, complex interface, bulky | Extreme data storage |
Next Steps and Project Ideas

With the foundation established in this guide, consider these advanced project directions:
- Multi-Sensor Logger: Record data from multiple sensors with precise timestamps
- GPS Data Logger: Store location coordinates for tracking and mapping applications
- Audio Recorder: Capture audio samples with additional hardware components
- Image Storage: Save images from camera modules for time-lapse or security
- Configuration Files: Store project settings that can be edited without reprogramming
- Data Analysis: Process and analyze stored data directly on Arduino