Why ESP32 Bluetooth Classic?
The ESP32 is a powerful microcontroller that comes with built-in Wi-Fi, Bluetooth Low Energy, and Bluetooth Classic capabilities. In this comprehensive tutorial, you'll learn how to harness the power of ESP32 Bluetooth Classic using Arduino IDE to establish seamless data exchange between an ESP32 and an Android smartphone.
Compared to Bluetooth Low Energy, the Classic version offers a more familiar approach for those accustomed to basic serial communication. It uses the standard serial protocol and functions, making it remarkably straightforward, especially if you have experience with traditional Bluetooth modules like the HC-06.
What You'll Need
Before we begin, gather these essential components for your ESP32 Bluetooth Classic project:
- ESP32 development board (any model with Bluetooth Classic support)
- Android smartphone with Bluetooth capability
- USB cable for programming the ESP32
- Breadboard and jumper wires for circuit assembly
- LED (any color) for output control demonstration
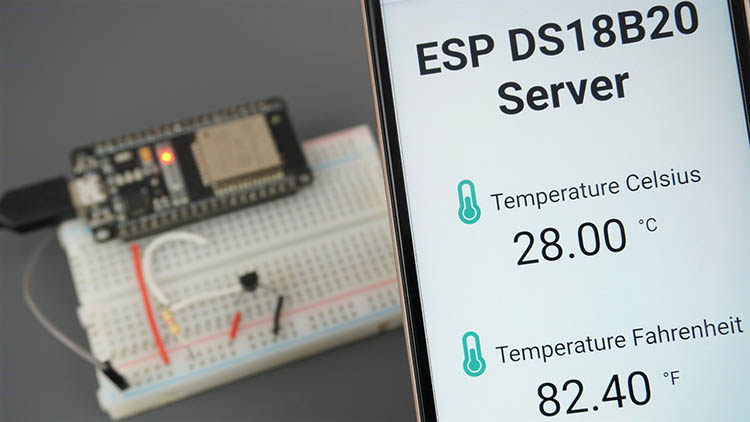
- DS18B20 temperature sensor for data transmission example
- 4.7kΩ resistor (for DS18B20 pull-up)
- Arduino IDE with ESP32 board support installed
- Serial Bluetooth Terminal app (available on Google Play Store)
- Required libraries: BluetoothSerial, OneWire, DallasTemperature
Getting Started: Basic Bluetooth Serial Communication
1 Install Required App and Libraries
First, install the "Serial Bluetooth Terminal" application from the Google Play Store on your Android device. This free app provides a clean interface for sending and receiving data via Bluetooth serial communication.
Ensure you have the ESP32 board support installed in your Arduino IDE. If not, you can install it via: File > Preferences > Additional Boards Manager URLs and adding the ESP32 board manager URL.
2 Basic Serial-to-Serial Bluetooth Example
Open the basic example that comes with the Arduino ESP32 boards package. Navigate to: File > Examples > BluetoothSerial > SerialtoSerialBT
                        // Basic Serial to Serial Bluetooth Bridge Example
                        #include "BluetoothSerial.h"

                        #if !defined(CONFIG_BT_ENABLED) || !defined(CONFIG_BLUEDROID_ENABLED)
                        #error Bluetooth is not enabled! Please run `make menuconfig` to enable it
                        #endif

                        BluetoothSerial SerialBT;

                        void setup() {
                        Serial.begin(115200);
                        SerialBT.begin("ESP32test"); // Set Bluetooth device name
                        Serial.println("The device started, now you can pair it with bluetooth!");
                        }

                        void loop() {
                        if (Serial.available()) {
                            SerialBT.write(Serial.read());
                        }
                        if (SerialBT.available()) {
                            Serial.write(SerialBT.read());
                        }
                        delay(20);
                        }
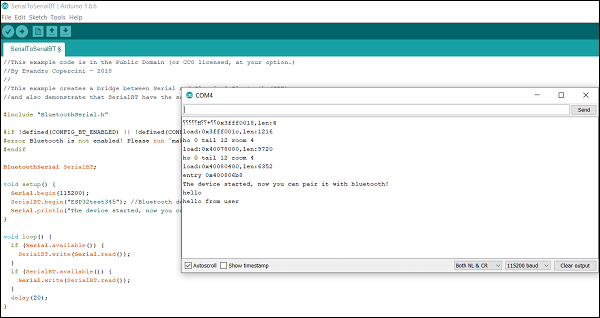
This code creates a two-way bridge between the hardware serial port and Bluetooth Classic. Data received on the hardware serial port (from your computer) is forwarded to the Bluetooth connection, and vice versa.
3 Test Basic Communication
Upload the code to your ESP32, open the Serial Monitor at 115200 baud, and press the ESP32's enable button. You should see: "The device started, now you can pair it with bluetooth!"
On your Android smartphone, open the Serial Bluetooth Terminal app, pair with "ESP32test", and establish a connection. You can now send messages between your computer and smartphone wirelessly!
Practical Project: Temperature Monitoring with LED Control
Now let's create a more practical application that:
- Sends temperature readings from a DS18B20 sensor to your smartphone every 10 seconds
- Allows you to control an LED connected to the ESP32 by sending commands from your phone
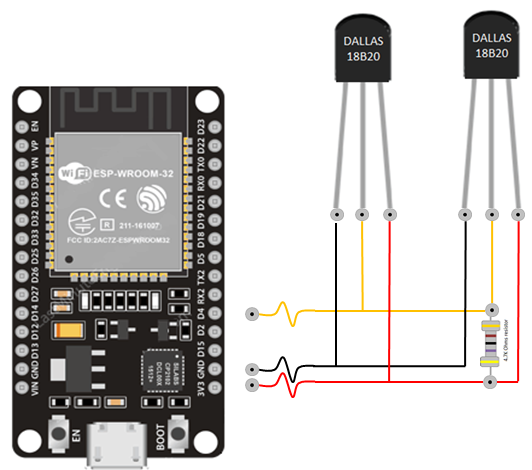
Circuit Assembly
Connect the components as follows:
- LED anode (long leg) → GPIO25 via a 220Ω resistor
- LED cathode (short leg) → GND
- DS18B20 data pin → GPIO32
- DS18B20 VDD → 3.3V
- DS18B20 GND → GND
- 4.7kΩ resistor between DS18B20 data and 3.3V (pull-up)
Install Required Libraries
For the DS18B20 temperature sensor, install these libraries via the Arduino Library Manager:
- OneWire by Paul Stoffregen
- DallasTemperature by Miles Burton
Complete Project Code
// ESP32 Bluetooth Classic: Temperature Monitoring and LED Control
#include "BluetoothSerial.h"
#include
#include

// Bluetooth configuration check
#if !defined(CONFIG_BT_ENABLED) || !defined(CONFIG_BLUEDROID_ENABLED)
#error Bluetooth is not enabled! Please run `make menuconfig` to enable it
#endif

BluetoothSerial SerialBT;          // Bluetooth Serial object
const int ledPin = 25;             // GPIO for LED control
const int oneWireBus = 32;         // GPIO for DS18B20 data

OneWire oneWire(oneWireBus);       // OneWire instance
DallasTemperature sensors(&oneWire); // Temperature sensor instance

String message = "";               // Stores received messages
String temperatureString = "";     // Stores formatted temperature

// Timer variables for periodic updates
unsigned long previousMillis = 0;
const long interval = 10000;       // 10-second interval

void setup() {
  pinMode(ledPin, OUTPUT);
  Serial.begin(115200);
  SerialBT.begin("ESP32");         // Custom Bluetooth name
  sensors.begin();                 // Initialize temperature sensor
  Serial.println("Device started. Pair via Bluetooth!");
}

void loop() {
  unsigned long currentMillis = millis();

  // Send temperature every 10 seconds
  if (currentMillis - previousMillis >= interval) {
    previousMillis = currentMillis;
    sensors.requestTemperatures();
    temperatureString = String(sensors.getTempCByIndex(0)) + "°C  " +
                       String(sensors.getTempFByIndex(0)) + "°F";
    SerialBT.println(temperatureString);
    Serial.println("Sent: " + temperatureString);
  }

  // Process incoming Bluetooth messages
  if (SerialBT.available()) {
    char incomingChar = SerialBT.read();
    if (incomingChar != '\n') {
      message += String(incomingChar);
    } else {
      // Execute command based on received message
      if (message == "led_on") {
        digitalWrite(ledPin, HIGH);
        SerialBT.println("LED turned ON");
        Serial.println("LED turned ON");
      } else if (message == "led_off") {
        digitalWrite(ledPin, LOW);
        SerialBT.println("LED turned OFF");
        Serial.println("LED turned OFF");
      }
      message = ""; // Clear message for next command
    }
  }
  delay(20);
}
4 How the Project Works
The project combines temperature sensing with remote control capabilities:
- Temperature Transmission: Every 10 seconds, the ESP32 reads the temperature, formats it into a string containing both Celsius and Fahrenheit values, and transmits it via Bluetooth using
SerialBT.println(). - Command Processing: The code continuously checks for incoming Bluetooth data. When a complete message (terminated with a newline character) is received, it's compared to predefined commands. Sending "led_on" turns the GPIO25 LED on, while "led_off" turns it off.
- Smartphone Integration: The Serial Bluetooth Terminal app allows you to save frequently used commands as buttons (M1, M2, etc.). You can assign "led_on" to M1 and "led_off" to M2 for one-tap control.
Troubleshooting Common Bluetooth Issues
Bluetooth Not Showing Up
Ensure your ESP32 board supports Bluetooth Classic (most do). Check that you've enabled Bluetooth in the Arduino board configuration by verifying the CONFIG_BT_ENABLED and CONFIG_BLUEDROID_ENABLED flags are set.
Connection Drops or Poor Range
Bluetooth Classic has a typical range of up to 10 meters without obstructions. Move devices closer together or eliminate physical barriers. Ensure there's minimal interference from other wireless devices.
Android App Connection Issues
Some Android devices require location services to be enabled for Bluetooth scanning. Ensure you've granted all necessary permissions to the Serial Bluetooth Terminal app. Try unpairing and repairing the device if connection problems persist.
Advanced Implementation Tips
SerialBT.begin(). Choose a unique, descriptive name to easily identify your ESP32 among other Bluetooth devices.
Expanding Your Project
This framework can be extended to:
- Control multiple GPIO pins and devices
- Read data from multiple sensors (humidity, pressure, light, etc.)
- Implement bidirectional communication for interactive applications
- Create home automation systems with wireless control
- Build remote sensor monitoring networks
Power Optimization for Battery-Powered Projects
For battery-powered applications, implement deep sleep between temperature readings and briefly wake the Bluetooth only when transmitting data to significantly extend battery life. The ESP32's power management capabilities make it ideal for wireless sensor nodes.
Wrapping Up
The ESP32's Bluetooth Classic capability opens up countless possibilities for wireless projects without the complexity of Bluetooth Low Energy. By treating Bluetooth as a simple serial connection, you can quickly adapt existing serial-based projects to work wirelessly.
The techniques covered in this tutorial provide a solid foundation for home automation systems, remote sensor monitoring, wireless control panels, IoT device prototyping, and educational demonstrations. Remember that every ESP32 project starts with these fundamental building blocks.
Once you've mastered Bluetooth Classic communication, you can combine it with the ESP32's Wi-Fi capabilities, deep sleep functions, and extensive GPIO options to create sophisticated, connected devices that bridge the physical and digital worlds.
What You've Learned
- How to set up basic Bluetooth Classic communication with ESP32
- Creating a practical temperature monitoring and control system
- Exchanging data wirelessly between ESP32 and Android devices
- Troubleshooting common Bluetooth connection issues
- Extending the basic framework for more complex applications
Congratulations! You've successfully implemented ESP32 Bluetooth Classic communication and created a functional wireless monitoring and control system. Happy coding with your ESP32 Bluetooth projects!