Introduction to ESP32 Wi-Fi Client-Server Model
The ESP32 is a powerful microcontroller with built-in Wi-Fi capabilities, making it ideal for Internet of Things (IoT) projects. One of its most valuable features is the ability to create both Wi-Fi clients and Wi-Fi servers, enabling bidirectional communication between devices. This comprehensive guide will walk you through setting up an ESP32 as both a client and server, with practical code examples you can implement immediately.
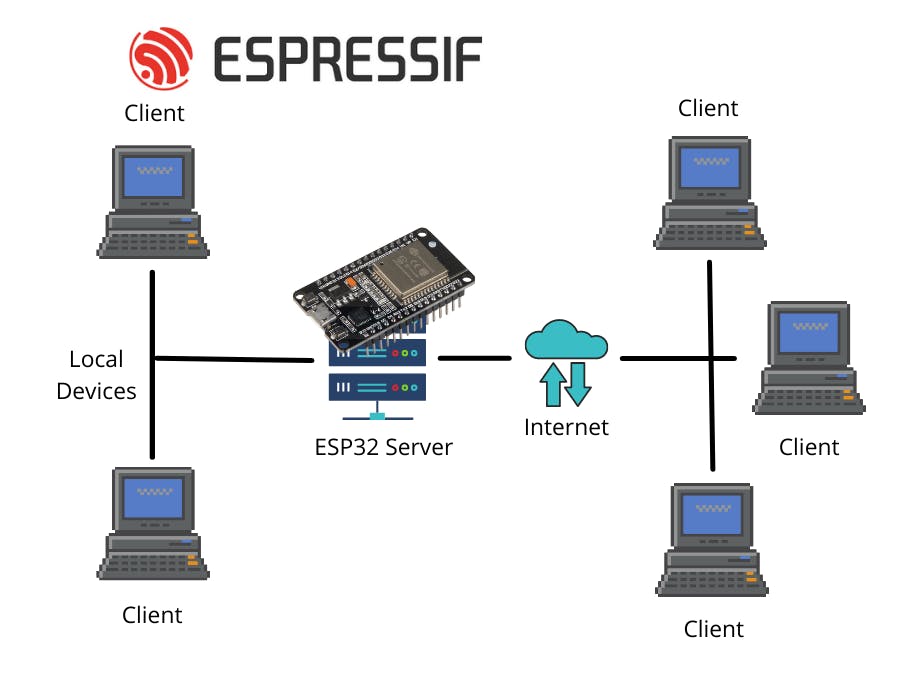
Understanding the client-server model is fundamental to networked applications. In this architecture, the server provides resources or services, while the client requests those services. With the ESP32, you can create applications where one board acts as a server hosting a web page or API, and another board (or multiple boards) acts as a client that connects to that server to send or receive data. This opens up countless possibilities for home automation, sensor networks, remote control systems, and IoT applications.
Prerequisites and Components Required
Before diving into the code, let's ensure you have everything needed for this ESP32 Wi-Fi project:
Hardware Components
- 2 × ESP32 development boards (or more for multiple clients)
- Breadboard and jumper wires
- USB cables for programming
- Optional: Sensors or actuators for extended projects
Software Requirements
- Arduino IDE installed on your computer
- ESP32 board add-on for Arduino IDE
- Basic understanding of Arduino programming
- Wi-Fi network with 2.4GHz capability
ESP32 Board Installation in Arduino IDE:
If you haven't installed the ESP32 boards in your Arduino IDE yet, follow these steps:
1 Open Arduino Preferences
Open Arduino IDE and go to File → Preferences
2 Add Board Manager URL
In Additional Board Manager URLs, add: https://raw.githubusercontent.com/espressif/arduino-esp32/gh-pages/package_esp32_index.json
3 Install ESP32 Package
Go to Tools → Board → Boards Manager, search for "ESP32" and install it
4 Select Board
Select your ESP32 board from Tools → Board menu
Understanding Network Communication Basics
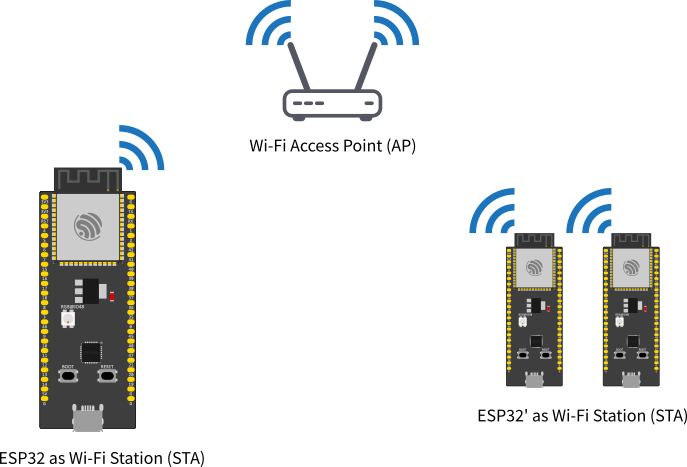
The ESP32 can connect to a Wi-Fi network as a station (client), similar to how your phone or laptop connects to Wi-Fi. It can also create its own Wi-Fi network as an access point (server), allowing other devices to connect directly to it. For most client-server applications, we use the station mode where the ESP32 connects to your existing Wi-Fi network.
Network Configuration: For these examples, we'll use the ESP32 in STA (station) mode, connecting to your existing router. The router's DHCP server will typically assign IP addresses automatically, though you can also use static IP addresses for more reliable communication in local networks.
Setting Up the ESP32 as a Wi-Fi Server
Let's begin by creating an ESP32 web server that clients can connect to. This server will host a simple web page that displays sensor data or accepts control commands.
Basic Web Server Code
                    #include <WiFi.h>
                    #include <WebServer.h>

                    // Replace with your network credentials
                    const char* ssid = "YOUR_SSID";
                    const char* password = "YOUR_PASSWORD";

                    WebServer server(80); // Create web server on port 80

                    // HTML content for the web page
                    const char* htmlContent = R"rawliteral(
                    <!DOCTYPE html>
                    <html>
                    <head>
                        <title>ESP32 Server</title>
                        <meta name="viewport" content="width=device-width, initial-scale=1">
                        <style>
                            body { font-family: Arial; text-align: center; margin-top: 50px; }
                            .button {
                                background-color: #4CAF50;
                                border: none;
                                color: white;
                                padding: 15px 32px;
                                text-align: center;
                                text-decoration: none;
                                display: inline-block;
                                font-size: 16px;
                                margin: 4px 2px;
                                cursor: pointer;
                                border-radius: 4px;
                            }
                            .button2 {background-color: #008CBA;}
                            .status { font-size: 24px; margin: 20px; }
                        </style>
                    </head>
                    <body>
                        <h1>ESP32 Web Server</h1>
                        <p>LED Control</p>
                        <a href="/ledon"><button class="button">LED ON</button></a>
                        <a href="/ledoff"><button class="button button2">LED OFF</button></a>
                        <div class="status">LED Status: %LED_STATUS%</div>
                    </body>
                    </html>
                    )rawliteral";

                    // Variables
                    String LED_STATUS = "OFF";

                    // GPIO pin for LED
                    const int ledPin = 2; // Built-in LED on most ESP32 boards

                    // Handle root URL
                    void handleRoot() {
                        String html = htmlContent;
                        html.replace("%LED_STATUS%", LED_STATUS);
                        server.send(200, "text/html", html);
                    }

                    // Handle LED ON
                    void handleLEDOn() {
                        digitalWrite(ledPin, HIGH);
                        LED_STATUS = "ON";
                        server.sendHeader("Location", "/");
                        server.send(303);
                    }

                    // Handle LED OFF
                    void handleLEDOff() {
                        digitalWrite(ledPin, LOW);
                        LED_STATUS = "OFF";
                        server.sendHeader("Location", "/");
                        server.send(303);
                    }

                    // Handle 404 - Not Found
                    void handleNotFound() {
                        server.send(404, "text/plain", "404: Not Found");
                    }

                    void setup() {
                        Serial.begin(115200);
                        pinMode(ledPin, OUTPUT);
                        digitalWrite(ledPin, LOW);

                        // Connect to Wi-Fi
                        WiFi.begin(ssid, password);
                        Serial.print("Connecting to WiFi");

                        while (WiFi.status() != WL_CONNECTED) {
                            delay(500);
                            Serial.print(".");
                        }

                        Serial.println("\nConnected to WiFi");
                        Serial.print("IP Address: ");
                        Serial.println(WiFi.localIP());

                        // Define server routes
                        server.on("/", handleRoot);
                        server.on("/ledon", handleLEDOn);
                        server.on("/ledoff", handleLEDOff);
                        server.onNotFound(handleNotFound);

                        // Start server
                        server.begin();
                        Serial.println("HTTP server started");
                    }

                    void loop() {
                        server.handleClient();
                    }
Server Code Explanation
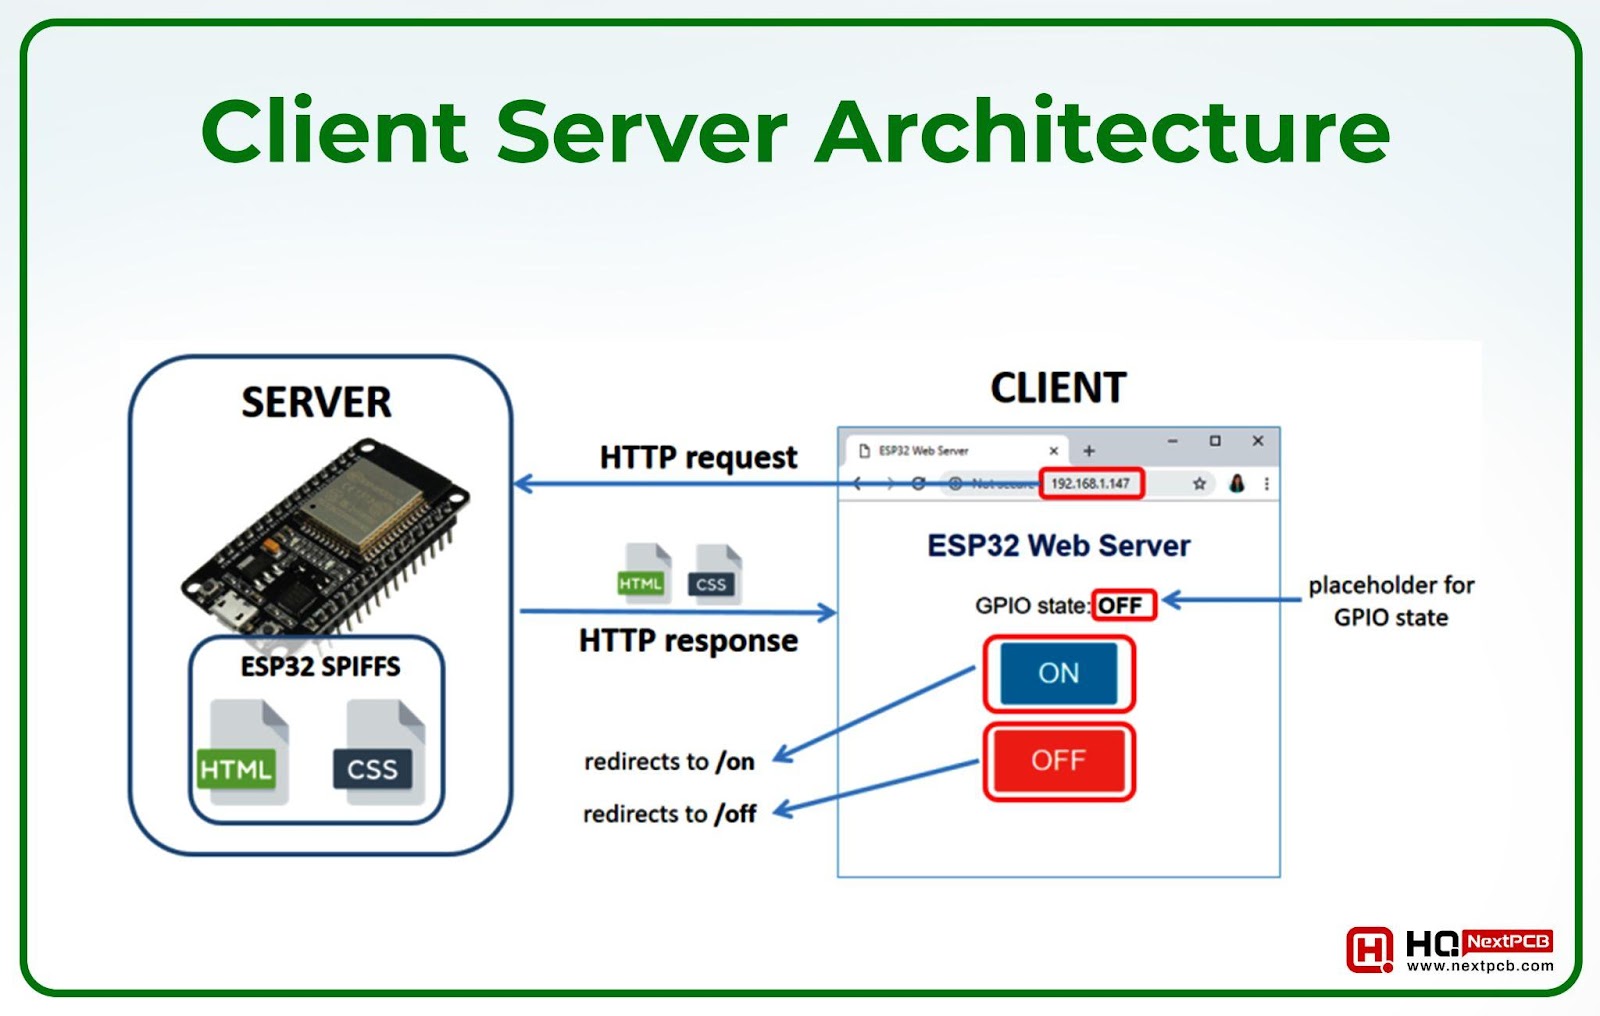
This ESP32 server code creates a web server that serves an HTML page with LED control buttons. Here's how it works:
1 Wi-Fi Connection
The ESP32 connects to your specified Wi-Fi network using the credentials provided in the code. Ensure you replace "YOUR_SSID" and "YOUR_PASSWORD" with your actual network credentials.
2 Web Server Initialization
A web server is created on port 80, which is the standard HTTP port for web traffic. This allows any device on your network to connect using a standard web browser.
3 HTML Content Definition
The server hosts a simple web interface with buttons to control an LED. The HTML includes CSS styling for a professional appearance and responsive design that works on both desktop and mobile devices.
4 Route Handling Configuration
Different URL paths are mapped to specific handler functions. The root path ("/") displays the main page, "/ledon" turns the LED on, and "/ledoff" turns the LED off.
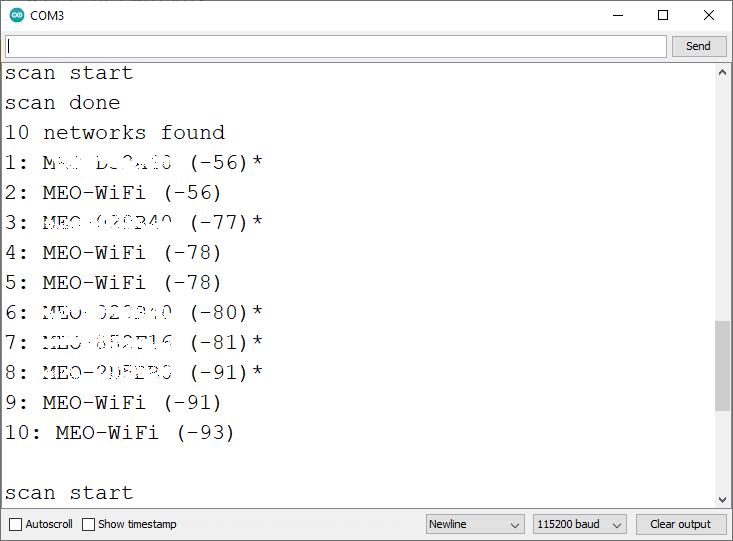
After uploading this code to your ESP32, open the Serial Monitor at 115200 baud. The ESP32 will print its IP address once connected to Wi-Fi. Enter this IP address in any web browser on a device connected to the same network, and you'll see the control page.
Setting Up the ESP32 as a Wi-Fi Client
Now let's create an ESP32 client that can connect to the server we just created. The client will make HTTP requests to control the LED or retrieve status information.
Basic Client Code
                    #include <WiFi.h>
                    #include <HTTPClient.h>

                    // Replace with your network credentials
                    const char* ssid = "YOUR_SSID";
                    const char* password = "YOUR_PASSWORD";

                    // Server details
                    const char* serverAddress = "http://SERVER_IP_ADDRESS"; // Replace with server IP
                    const int serverPort = 80;

                    // Buttons for control
                    const int buttonOnPin = 12;
                    const int buttonOffPin = 14;

                    // Variables
                    int buttonOnState = 0;
                    int buttonOffState = 0;
                    int lastButtonOnState = 0;
                    int lastButtonOffState = 0;

                    void setup() {
                        Serial.begin(115200);

                        // Initialize buttons
                        pinMode(buttonOnPin, INPUT_PULLUP);
                        pinMode(buttonOffPin, INPUT_PULLUP);

                        // Connect to Wi-Fi
                        WiFi.begin(ssid, password);
                        Serial.print("Connecting to WiFi");

                        while (WiFi.status() != WL_CONNECTED) {
                            delay(500);
                            Serial.print(".");
                        }

                        Serial.println("\nConnected to WiFi");
                        Serial.print("IP Address: ");
                        Serial.println(WiFi.localIP());
                    }

                    void loop() {
                        // Read button states
                        buttonOnState = digitalRead(buttonOnPin);
                        buttonOffState = digitalRead(buttonOffPin);

                        // Check if ON button was pressed
                        if (buttonOnState != lastButtonOnState) {
                            if (buttonOnState == LOW) {
                                sendRequest("/ledon");
                                Serial.println("LED ON request sent");
                            }
                            delay(50); // Debounce delay
                        }
                        lastButtonOnState = buttonOnState;

                        // Check if OFF button was pressed
                        if (buttonOffState != lastButtonOffState) {
                            if (buttonOffState == LOW) {
                                sendRequest("/ledoff");
                                Serial.println("LED OFF request sent");
                            }
                            delay(50); // Debounce delay
                        }
                        lastButtonOffState = buttonOffState;

                        // Optional: Periodically get status
                        static unsigned long lastStatusCheck = 0;
                        if (millis() - lastStatusCheck > 10000) { // Every 10 seconds
                            getStatus();
                            lastStatusCheck = millis();
                        }
                    }

                    // Function to send HTTP GET request
                    void sendRequest(String path) {
                        if (WiFi.status() == WL_CONNECTED) {
                            HTTPClient http;

                            String fullURL = String(serverAddress) + path;

                            http.begin(fullURL);
                            int httpCode = http.GET();

                            if (httpCode > 0) {
                                Serial.printf("HTTP response code: %d\n", httpCode);
                                String payload = http.getString();
                                Serial.println(payload);
                            } else {
                                Serial.printf("HTTP request failed, error: %s\n", http.errorToString(httpCode).c_str());
                            }

                            http.end();
                        } else {
                            Serial.println("Wi-Fi not connected");
                        }
                    }

                    // Function to get server status
                    void getStatus() {
                        if (WiFi.status() == WL_CONNECTED) {
                            HTTPClient http;

                            String fullURL = String(serverAddress) + "/";

                            http.begin(fullURL);
                            int httpCode = http.GET();

                            if (httpCode > 0) {
                                String payload = http.getString();
                                // Parse the response to extract LED status
                                // This would require more advanced parsing
                                Serial.println("Status check completed");
                            }

                            http.end();
                        }
                    }
Client Code Explanation
The client code demonstrates how an ESP32 can act as an HTTP client to communicate with the server:
1 Wi-Fi Connection Setup
Similar to the server, the client connects to the same Wi-Fi network using identical credentials. Both devices must be on the same network for local communication.
2 Button Input Configuration
Two buttons are connected to GPIO pins 12 and 14 and configured with internal pull-up resistors. These buttons trigger LED control requests when pressed.
3 HTTP Request Function
The sendRequest() function makes GET requests to the server's endpoints. It constructs the full URL by combining the server address with the specific path (like "/ledon" or "/ledoff").
4 Response Handling Logic
The client receives and processes responses from the server. Successful requests return HTTP status code 200, while errors return different codes that help with debugging.
Replace SERVER_IP_ADDRESS with the actual IP address of your ESP32 server (printed in the Serial Monitor when the server starts). When you press the buttons connected to the client ESP32, it will send HTTP requests to the server to control the LED.
Advanced Client-Server Communication
Sending Data from Client to Server
Beyond simple control commands, you can send sensor data from client to server. Here's an enhanced client example that reads a temperature sensor and sends the data:
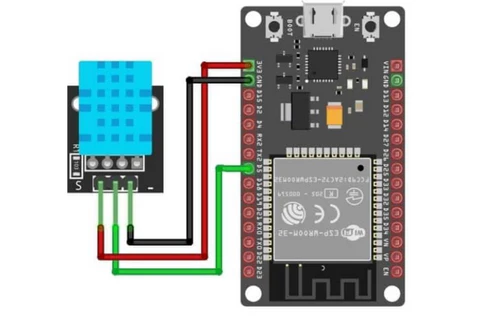
                    // Add to client code - DHT sensor example
                    #include <DHT.h>

                    #define DHTPIN 4
                    #define DHTTYPE DHT11
                    DHT dht(DHTPIN, DHTTYPE);

                    // Add to setup()
                    dht.begin();

                    // New function to send sensor data
                    void sendSensorData() {
                        float temperature = dht.readTemperature();
                        float humidity = dht.readHumidity();

                        if (isnan(temperature) || isnan(humidity)) {
                            Serial.println("Failed to read from DHT sensor");
                            return;
                        }

                        if (WiFi.status() == WL_CONNECTED) {
                            HTTPClient http;

                            String fullURL = String(serverAddress) + "/data";
                            fullURL += "?temp=" + String(temperature);
                            fullURL += "&hum=" + String(humidity);

                            http.begin(fullURL);
                            int httpCode = http.GET();

                            if (httpCode > 0) {
                                Serial.printf("Data sent. HTTP code: %d\n", httpCode);
                            }

                            http.end();
                        }
                    }

                    // Call periodically in loop()
                    static unsigned long lastDataSend = 0;
                    if (millis() - lastDataSend > 30000) { // Every 30 seconds
                        sendSensorData();
                        lastDataSend = millis();
                    }
Enhanced Server to Handle Data
Update the server code to handle the incoming sensor data:
                    // Add variable to store sensor data
                    float lastTemperature = 0.0;
                    float lastHumidity = 0.0;

                    // Add new route handler
                    void handleData() {
                        if (server.hasArg("temp") && server.hasArg("hum")) {
                            lastTemperature = server.arg("temp").toFloat();
                            lastHumidity = server.arg("hum").toFloat();

                            Serial.print("Temperature received: ");
                            Serial.println(lastTemperature);
                            Serial.print("Humidity received: ");
                            Serial.println(lastHumidity);

                            server.send(200, "text/plain", "Data received");
                        } else {
                            server.send(400, "text/plain", "Missing parameters");
                        }
                    }

                    // Add in setup() after other server.on() calls
                    server.on("/data", handleData);

                    // Update HTML to display sensor data
                    // Add to htmlContent after LED status:
                    // <div class="sensor-data">Temperature: %TEMPERATURE%°C</div>
                    // <div class="sensor-data">Humidity: %HUMIDITY%%</div>

                    // Update handleRoot() to include sensor data
                    html.replace("%TEMPERATURE%", String(lastTemperature));
                    html.replace("%HUMIDITY%", String(lastHumidity));
Multiple Clients and Server Management
Handling Multiple Simultaneous Clients
The ESP32 web server library can handle multiple clients simultaneously. However, for many simultaneous connections or high-frequency requests, consider these optimizations:
Performance Optimization Tips
- Keep Connections Brief: Process requests quickly and close connections
- Use AsyncWebServer: For more demanding applications, use the AsyncWebServer library
- Implement Timeouts: Close stale connections to free resources
- Reduce String Operations: Use character arrays instead of String objects where possible
Example with AsyncWebServer
For better performance with multiple clients, consider using the AsyncWebServer library:
#include <WiFi.h>
#include <AsyncTCP.h>
#include <ESPAsyncWebServer.h>

AsyncWebServer asyncServer(80);

// In setup(), after WiFi connection:
asyncServer.on("/", HTTP_GET, [](AsyncWebServerRequest *request){
    String html = htmlContent;
    html.replace("%LED_STATUS%", LED_STATUS);
    request->send(200, "text/html", html);
});

asyncServer.on("/ledon", HTTP_GET, [](AsyncWebServerRequest *request){
    digitalWrite(ledPin, HIGH);
    LED_STATUS = "ON";
    request->redirect("/");
});

asyncServer.begin();
Troubleshooting Common Issues
Connection Debugging Checklist:
1 ESP32 Won't Connect to Wi-Fi
Verify SSID and password are correct. Ensure router uses 2.4GHz band. Check router security settings (WPA2 is recommended).
2 Client Can't Reach Server
Verify both devices are on the same network. Check firewall settings on the router. Confirm server IP address hasn't changed.
3 High Latency or Timeouts
Reduce distance between ESP32 and router. Minimize interference from other devices. Reduce data transmission frequency.
Code Debugging Tips
- Serial Monitor is Your Friend: Use extensive Serial.print() statements to track program flow
- Check HTTP Response Codes: 200: Success, 404: Page not found, 500: Server error
- Monitor Memory Usage: ESP32 has limited RAM; avoid large string operations in loops
- Verify GPIO Connections: Double-check your wiring, especially for buttons and sensors
Practical Applications and Project Ideas
Home Automation System
Create a distributed home automation system with multiple ESP32 clients (sensors and actuators) and one central ESP32 server that hosts a control dashboard.
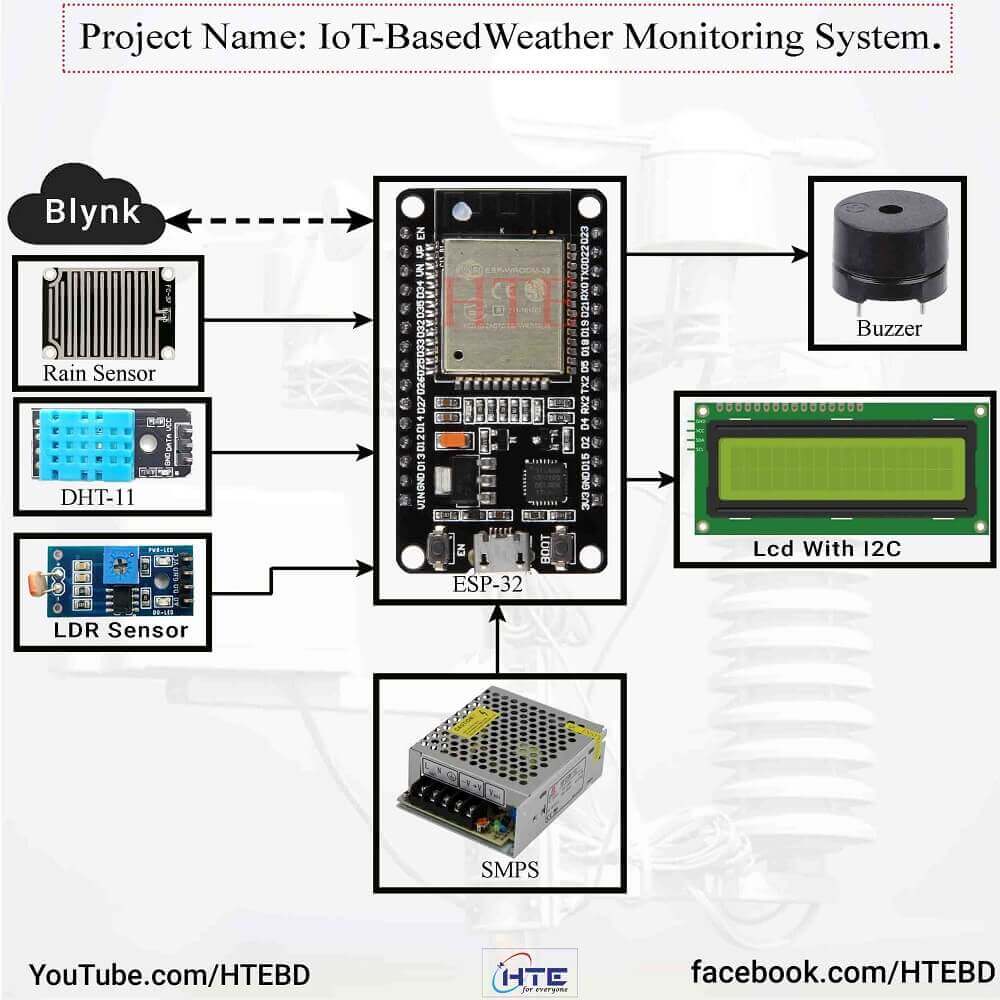
Environmental Monitoring Network
Deploy multiple ESP32 clients with environmental sensors (temperature, humidity, air quality) throughout a building, all reporting to a central server that logs and displays the data.
Industrial Control System
Implement a simple SCADA (Supervisory Control and Data Acquisition) system with ESP32 clients monitoring machinery and an ESP32 server providing a control interface.
Educational Demonstration
Create an interactive classroom demonstration of networking principles using multiple ESP32 boards to show client-server architecture in action.
Security Considerations
While these examples focus on functionality, consider these security enhancements for production applications:
Security Enhancements
- Authentication: Add basic authentication to server endpoints
- HTTPS: Use HTTPS for encrypted communication (requires certificate)
- Input Validation: Sanitize all inputs to prevent injection attacks
- Network Segregation: Place IoT devices on a separate VLAN
- Regular Updates: Keep ESP32 firmware and libraries updated
Conclusion and Next Steps
You've now learned how to implement both ESP32 Wi-Fi client and server configurations. This foundation enables you to create sophisticated IoT systems with multiple devices communicating over your local network. The client-server model demonstrated here forms the basis for most networked applications.
The ESP32's versatile Wi-Fi capabilities, combined with its processing power and extensive peripheral support, make it an excellent choice for a wide range of networked applications. Start with the examples provided, experiment with modifications, and gradually build more complex systems as you become comfortable with the client-server paradigm.
Remember that successful IoT projects often evolve through iteration. Begin with simple communication, ensure reliability, then add features and complexity. The ESP32 platform provides an excellent balance of capability and accessibility for both beginners and experienced developers in the IoT space.
By mastering ESP32 client-server communication, you're building skills applicable to countless IoT and networking projects. Whether you're creating a smart home system, industrial monitors, or educational tools, these fundamentals will serve as the foundation for your success in the interconnected world of embedded systems.
Happy coding with your ESP32 and exploring the exciting world of IoT communication!