What is an ESP32 Web Server?
In this comprehensive tutorial, you will learn how to transform your ESP32 into a fully functional web server. Using the Arduino IDE, we will program the board to serve a web page that allows you to control its outputs remotely from any device on your local network. Imagine turning an LED on or off with a simple click in your web browser—this project will show you exactly how to do that, providing the foundational knowledge for more advanced Internet of Things (IoT) applications.
Project Overview
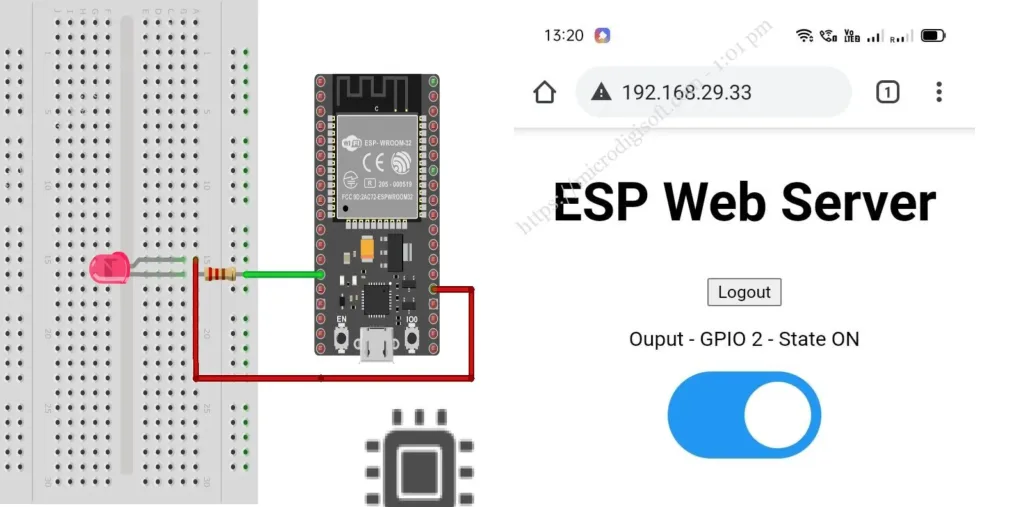
Our goal is to create a simple web server with the ESP32 that controls two onboard LED outputs. The web page we build will display a title, two buttons, and the current GPIO state (ON or OFF). Clicking a button will send a request to the ESP32 to toggle the corresponding LED, and the page will update to reflect the new state. This "stateful" behavior, where the page updates without needing manual refresh, is a key feature we'll implement.
Parts Required
To follow this tutorial, you will need:
- An ESP32 development board.
- A USB cable for power and programming.
- The Arduino IDE installed on your computer.
Step-by-Step Guide
1 Install ESP32 Board in Arduino IDE
To program the ESP32 with Arduino IDE, you must first install the ESP32 board add-on.
- Open Arduino IDE and go to File > Preferences.
- In the "Additional Boards Manager URLs" field, enter:
https://espressif.github.io/arduino-esp32/package_esp32_index.json - Open the Boards Manager via Tools > Board > Boards Manager, search for "esp32", and install the "ESP32 by Espressif Systems" package.
- Select your ESP32 board (e.g., DOIT ESP32 DEVKIT V1) from Tools > Board.
2 Complete Code for ESP32 Web Server
Copy the following code to your Arduino IDE. Before uploading, you must insert your network credentials.
                        // Load necessary libraries
                        #include <WiFi.h>
                        #include <WebServer.h>

                        // Replace with your network credentials
                        const char* ssid = "YOUR_SSID";
                        const char* password = "YOUR_PASSWORD";

                        // Instantiate a web server on port 80
                        WebServer server(80);

                        // Variable to store the HTTP request
                        String header;

                        // Auxiliary variables for GPIO states
                        String output26State = "off";
                        String output27State = "off";

                        // Assign output variables to GPIO pins
                        const int output26 = 26;
                        const int output27 = 27;

                        // Current time
                        unsigned long currentTime = millis();
                        // Previous time
                        unsigned long previousTime = 0;
                        // Define timeout time in milliseconds (example: 2000ms = 2s)
                        const long timeoutTime = 2000;

                        void setup() {
                        Serial.begin(115200);
                        // Initialize the output variables as outputs
                        pinMode(output26, OUTPUT);
                        pinMode(output27, OUTPUT);
                        // Set outputs to LOW
                        digitalWrite(output26, LOW);
                        digitalWrite(output27, LOW);

                        // Connect to Wi-Fi network with SSID and password
                        Serial.print("Connecting to ");
                        Serial.println(ssid);
                        WiFi.begin(ssid, password);
                        while (WiFi.status() != WL_CONNECTED) {
                            delay(500);
                            Serial.print(".");
                        }
                        // Print local IP address and start web server
                        Serial.println("");
                        Serial.println("WiFi connected.");
                        Serial.println("IP address: ");
                        Serial.println(WiFi.localIP());
                        server.begin();
                        }

                        void loop(){
                        server.handleClient();
                        }
YOUR_SSID and YOUR_PASSWORD with the actual name and password of your 2.4GHz Wi-Fi network.
3 Setting up the Web Page (HTML)
The web page is sent to the client as an HTML document. We add this code inside the setup() function, right before the server.begin() line.
This HTML code creates a responsive web interface with two buttons that toggle the LED states. The interface updates dynamically without requiring page refresh.
4 Uploading the Code and Testing
- Insert your SSID and password in the code.
- Select the correct board and COM port in the Arduino IDE.
- Click the upload button.
- Open the Serial Monitor at a baud rate of 115200. You should see the ESP32's IP address once it connects to Wi-Fi.

Copy the IP address and paste it into any web browser on a device connected to the same network. You should see the web page with the two buttons. Click the buttons to control the LEDs. The page updates instantly to show the new state.
Troubleshooting Common Issues
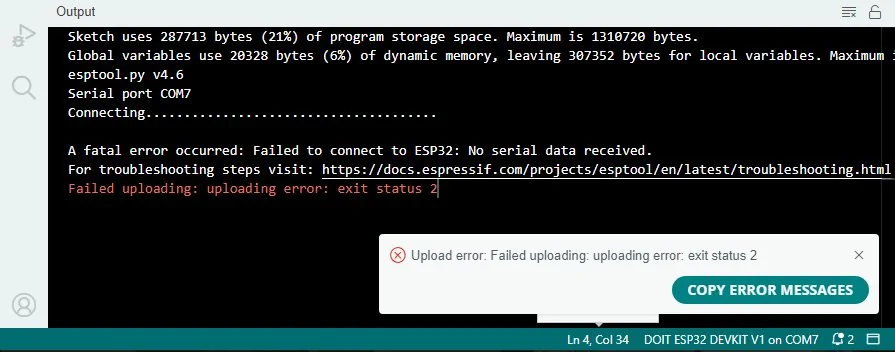
Can't upload code?
Ensure you've selected the correct board and that the correct COM port is chosen. You might need to press the BOOT button on the ESP32 during upload.
Not connecting to Wi-Fi?
Double-check your SSID and password. Ensure your router is broadcasting a 2.4GHz network (the ESP32 doesn't support 5GHz).
Can't access the web page?
Verify your client device is on the same network. Check if your firewall is blocking port 80.
Going Further
Congratulations! You've built a basic web server. You can expand this project by:
- Controlling more outputs (like relays for lamps or appliances).
- Adding input sensors (like temperature readings) and displaying their values on the web page.
- Incorporating CSS frameworks like Bootstrap to style a more professional interface.
- Adding authentication to secure your web server.
