Build Your Own IoT Data Logging System
In this comprehensive tutorial, you'll learn to create a complete IoT system where your ESP32 or ESP8266 board sends sensor readings to a MySQL database via PHP. You'll also build a web page that displays this data, accessible from anywhere in the world through your own domain name.
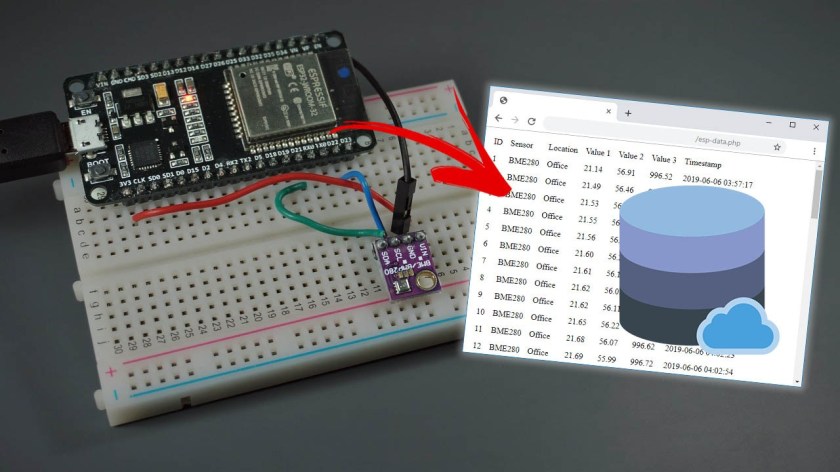
Unlike third-party IoT platforms that limit your access or charge for data storage, this solution gives you complete ownership of your data. We'll use a BME280 environmental sensor as our example, but the system can easily be adapted for any sensor or multiple boards simultaneously.
Choosing Your Web Hosting Solution
The foundation of this project is reliable hosting with PHP and MySQL support. While you could run a local server, professional hosting allows global access without complex network configurations.
Bluehost offers a user-friendly cPanel interface with a free domain name on longer-term plans. Ideal for beginners with unlimited websites option. Includes one-click MySQL database setup and PHP support out of the box.
Digital Ocean provides more control through Linux server command-line interface. Better for advanced users comfortable with server administration who want maximum flexibility and scalability.
Any hosting service supporting PHP and MySQL will work. Consider factors like price, support, uptime, and ease of database management when choosing your provider.
Step-by-Step: Setting Up MySQL Database
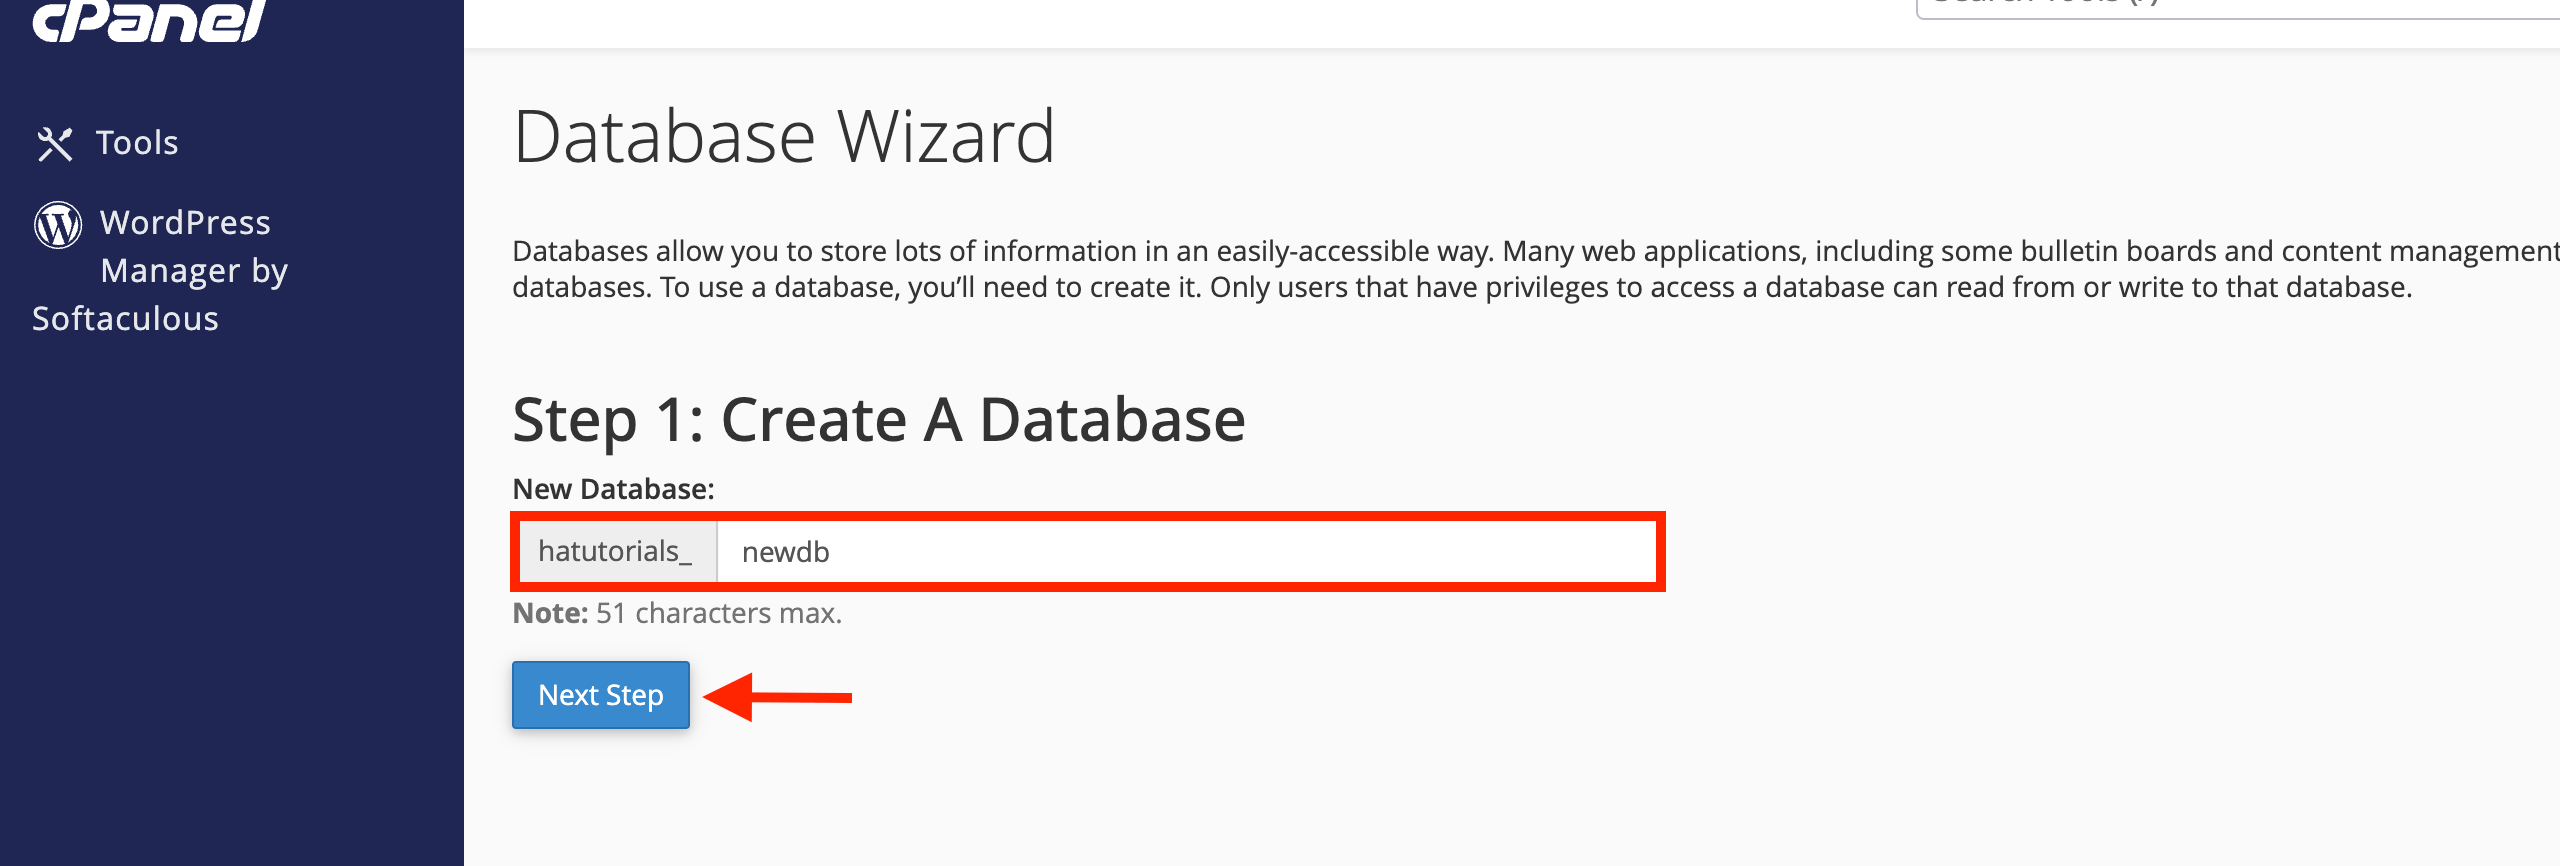
1 Create Database and User
Access your hosting control panel and navigate to MySQL Database Wizard. Create a new database (example: esp_data), then create a user with full privileges. Save these credentials securely.
Database Name: example_esp_data
Username: example_esp_board
Password: [your_secure_password]
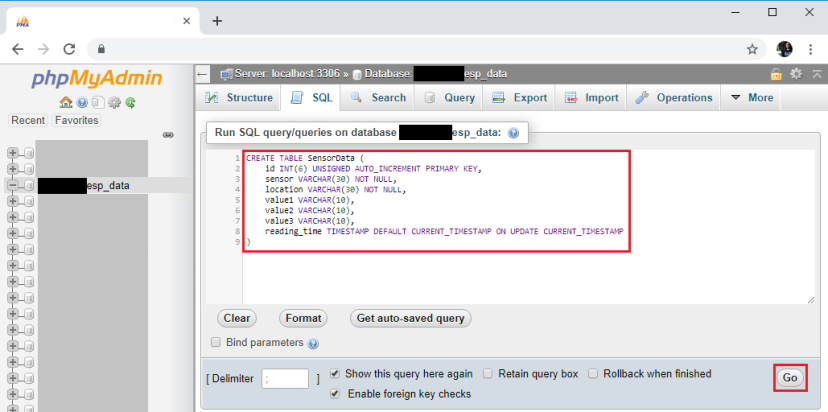
2 Create Sensor Data Table
Open phpMyAdmin, select your database, and execute this SQL query to create the SensorData table:
CREATE TABLE SensorData (
    id INT(6) UNSIGNED AUTO_INCREMENT PRIMARY KEY,
    sensor VARCHAR(30) NOT NULL,
    location VARCHAR(30) NOT NULL,
    value1 VARCHAR(10),
    value2 VARCHAR(10),
    value3 VARCHAR(10),
    reading_time TIMESTAMP DEFAULT CURRENT_TIMESTAMP ON UPDATE CURRENT_TIMESTAMP
)
Creating PHP Scripts for Data Handling
3 Data Receiver Script (post-esp-data.php)
Create a PHP file in your public_html directory that receives ESP32/ESP8266 POST requests and inserts data into MySQL:
<?php
$servername = "localhost";
$dbname = "example_esp_data";
$username = "example_esp_board";
$password = "YOUR_PASSWORD";
$api_key_value = "tPmAT5Ab3j7F9";

if ($_SERVER["REQUEST_METHOD"] == "POST") {
    $api_key = test_input($_POST["api_key"]);
    if($api_key == $api_key_value) {
        // Get and sanitize POST data
        $sensor = test_input($_POST["sensor"]);
        $location = test_input($_POST["location"]);
        $value1 = test_input($_POST["value1"]);
        $value2 = test_input($_POST["value2"]);
        $value3 = test_input($_POST["value3"]);

        // Insert into database
        $conn = new mysqli($servername, $username, $password, $dbname);
        $sql = "INSERT INTO SensorData (sensor, location, value1, value2, value3)
                VALUES ('$sensor', '$location', '$value1', '$value2', '$value3')";
        $conn->query($sql);
        $conn->close();

        echo "New record created successfully";
    }
}
?>
4 Data Display Script (esp-data.php)
Create a second PHP file that retrieves and displays database content in an HTML table:
<!DOCTYPE html>
<html>
<head>
    <title>ESP Sensor Data</title>
    <style>table {border-collapse: collapse; width: 100%;}
           th, td {border: 1px solid #ddd; padding: 8px;}
           th {background-color: #4CAF50; color: white;}</style>
</head>
<body>
    <h1>ESP32/ESP8266 Sensor Data</h1>
    <?php
    // Database connection
    $conn = new mysqli($servername, $username, $password, $dbname);

    // Retrieve data sorted by most recent
    $sql = "SELECT id, sensor, location, value1, value2, value3, reading_time
            FROM SensorData ORDER BY id DESC";

    // Display as HTML table
    if ($result = $conn->query($sql)) {
        echo '<table><tr><th>ID</th><th>Sensor</th>
              <th>Location</th><th>Value 1</th>
              <th>Value 2</th><th>Value 3</th>
              <th>Timestamp</th></tr>';

        while ($row = $result->fetch_assoc()) {
            echo '<tr><td>' . $row["id"] . '</td>
                  <td>' . $row["sensor"] . '</td>
                  <td>' . $row["location"] . '</td>
                  <td>' . $row["value1"] . '</td>
                  <td>' . $row["value2"] . '</td>
                  <td>' . $row["value3"] . '</td>
                  <td>' . $row["reading_time"] . '</td></tr>';
        }
        echo '</table>';
    }
    $conn->close();
    ?>
</body>
</html>

Hardware Setup and ESP Programming
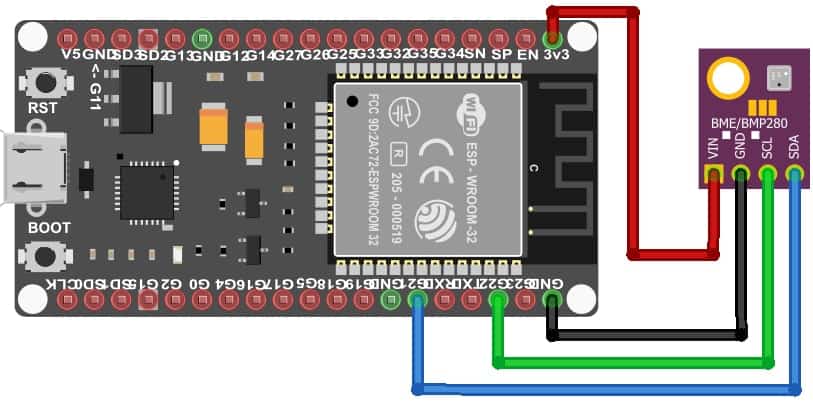
5 Circuit Connections
Connect BME280 sensor to your ESP32 or ESP8266:
ESP32 Connections:
- GPIO 21 (SDA) → BME280 SDA
- GPIO 22 (SCL) → BME280 SCL
- 3.3V → BME280 VIN
- GND → BME280 GND
ESP8266 Connections:
- GPIO 4 (D2) → BME280 SDA
- GPIO 5 (D1) → BME280 SCL
- 3.3V → BME280 VIN
- GND → BME280 GND
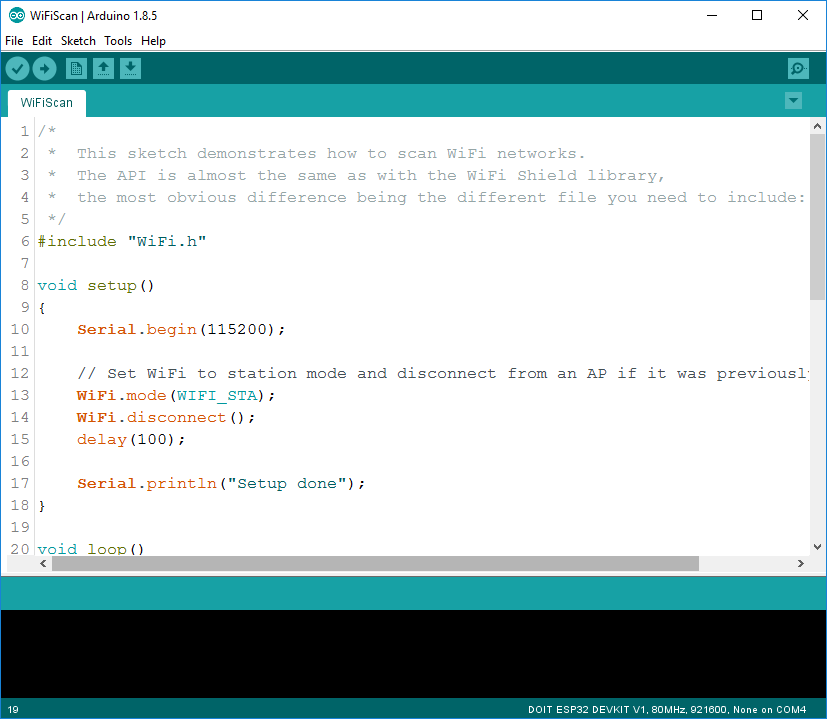
6 ESP32/ESP8266 Code
Upload this Arduino code to send sensor readings to your PHP script every 30 seconds:
#include <WiFi.h>
#include <HTTPClient.h>
#include <Wire.h>
#include <Adafruit_BME280.h>

const char* ssid = "YOUR_WIFI_SSID";
const char* password = "YOUR_WIFI_PASSWORD";
const char* serverName = "https://your-domain.com/post-esp-data.php";
const char* apiKeyValue = "tPmAT5Ab3j7F9";

Adafruit_BME280 bme;
unsigned long lastTime = 0;
unsigned long timerDelay = 30000;

void setup() {
  Serial.begin(115200);
  bme.begin(0x76);
  WiFi.begin(ssid, password);

  while (WiFi.status() != WL_CONNECTED) {
    delay(1000);
    Serial.println("Connecting to WiFi...");
  }
  Serial.println("Connected to WiFi!");
}

void loop() {
  if ((millis() - lastTime) > timerDelay) {
    if(WiFi.status() == WL_CONNECTED){
      HTTPClient http;
      http.begin(serverName);
      http.addHeader("Content-Type", "application/x-www-form-urlencoded");

      float temperature = bme.readTemperature();
      float humidity = bme.readHumidity();
      float pressure = bme.readPressure() / 100.0F;

      String httpRequestData = "api_key=" + String(apiKeyValue)
                             + "&sensor=BME280&location=Office"
                             + "&value1=" + String(temperature)
                             + "&value2=" + String(humidity)
                             + "&value3=" + String(pressure);

      int httpResponseCode = http.POST(httpRequestData);

      if (httpResponseCode > 0) {
        Serial.print("HTTP Response: ");
        Serial.println(httpResponseCode);
        String response = http.getString();
        Serial.println(response);
      }
      http.end();
    }
    lastTime = millis();
  }
}
Testing and Troubleshooting
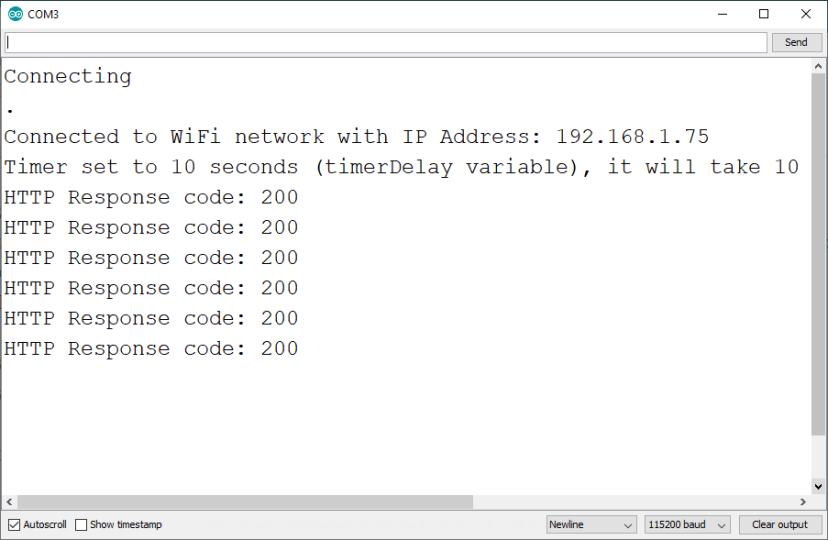
System Verification Checklist
- Database Connectivity: Test PHP scripts directly in browser
- WiFi Connection: Verify ESP connects to WiFi (check serial monitor)
- Sensor Readings: Confirm BME280 data appears in serial monitor
- HTTP Requests: Monitor HTTP response codes in serial output
- Web Interface: Access esp-data.php to view stored data
Common Issues and Solutions
- PHP Script Returns Empty: Verify database credentials match cPanel exactly
- ESP Fails to Connect: Check WiFi credentials and router settings
- Data Not Appearing: Confirm data insertion via post-esp-data.php
- API Key Errors: Ensure api_key_value matches in PHP and ESP code
- COM Port Issues: Install correct USB-to-UART drivers (CP210x/CH340)
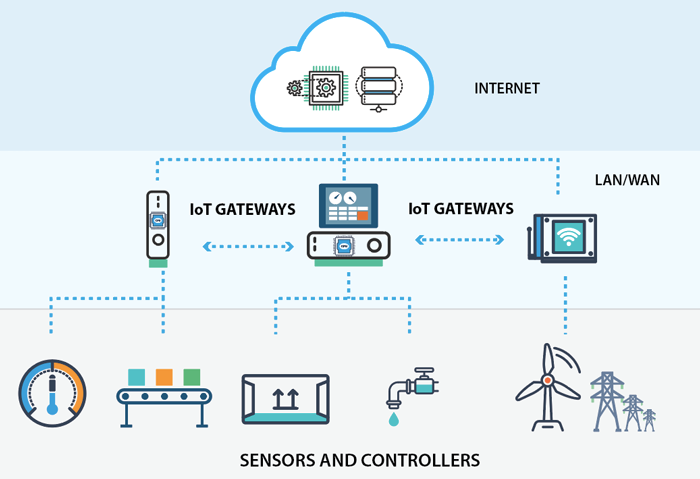
Advanced Customizations and Scaling
Once your basic system works, consider these enhancements:
Multiple Sensor Support: Modify database table and PHP scripts to accommodate additional sensors. Add more value columns or create separate tables for different sensor types.
Data Visualization: Enhance esp-data.php with graphical representations using Chart.js, implement date range filtering, and create summary statistics (averages, min/max values).
Security Enhancements: For production systems, implement HTTPS for all communications, add IP-based access restrictions, create user authentication for data pages, and set up regular database backups.
Conclusion: Your Complete IoT Data System
You've now built a professional-grade IoT data logging system with complete data ownership, global accessibility, and no recurring platform fees. This modular architecture allows easy maintenance and expansion for future projects.
Key advantages of your new system:
- Complete data ownership without third-party platform dependencies
- Global accessibility from anywhere with internet access
- Cost-effective with one-time hosting costs
- Highly customizable for different sensors and requirements
- Easily scalable to multiple sensors or locations
Remember to regularly backup your database and monitor hosting resource usage. With this foundation, you can expand into more complex IoT applications, integrate with other systems, or develop commercial products based on your sensor data.